Flukes, Flaws, & Goblin's BandBox
This was going to be a simple article about how to build Goblin’s BandBox, which is a clever piece of exercise equipment created by Pascal Dornier. The dice of life didn’t roll as I had hoped. What follows includes the instructions and my quixotic quest for perfection. It even involves a car chase.
Goblin’s BandBox
I have been expanding my home gym. I wanted to do trap bar deadlifts, but I didn’t want a big trap bar and weights just for deadlifts. One way to do this is with resistance bands.
My friend Devon, whom I recently visited, likes to travel light and uses resistance bands exclusively for working out. He’s in great shape so I thought I’d try them, too. I tried deadlifting with them under my feet. Then I tried with a board under my feet to hold down the resistance bands, but it was awkward.
Then I discovered Goblin’s BandBox. You can watch Pascal in an instructional video to see how it works. Very cool. He even provides an instruction manual.
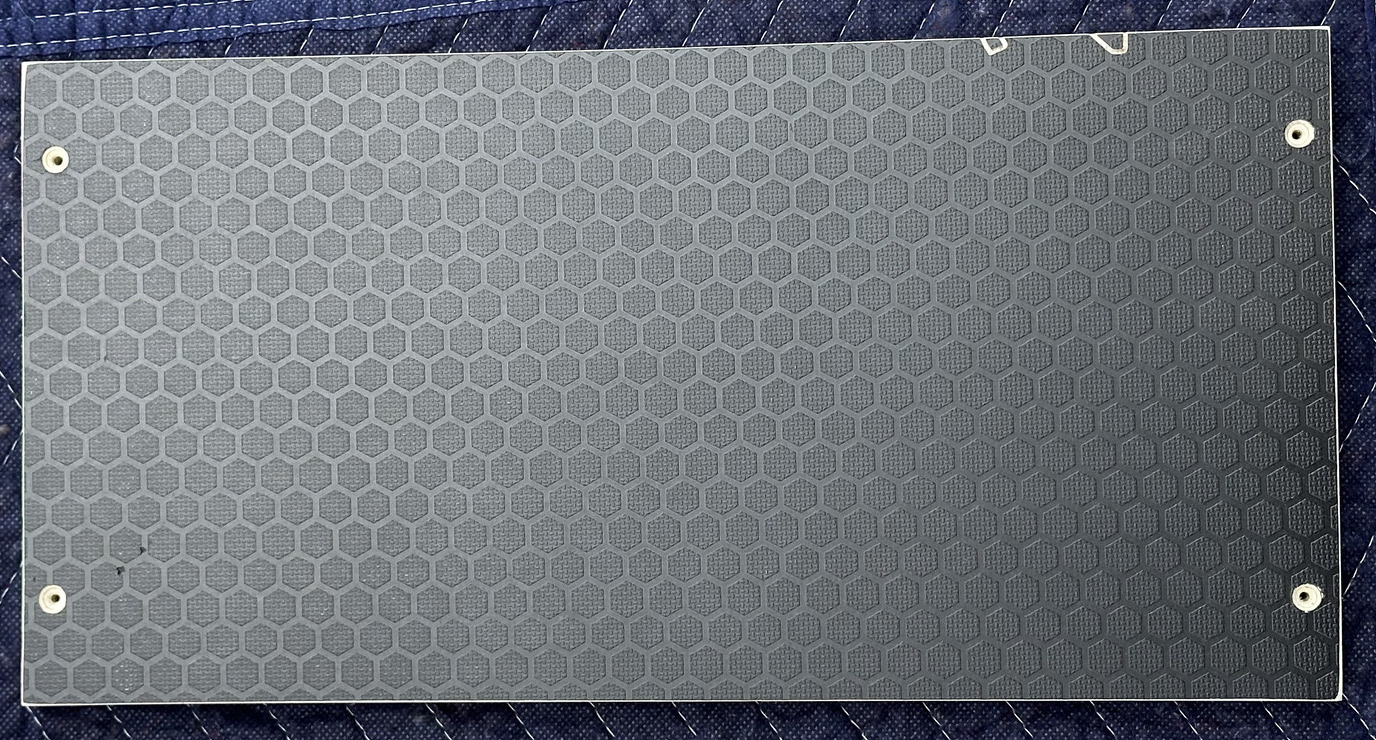
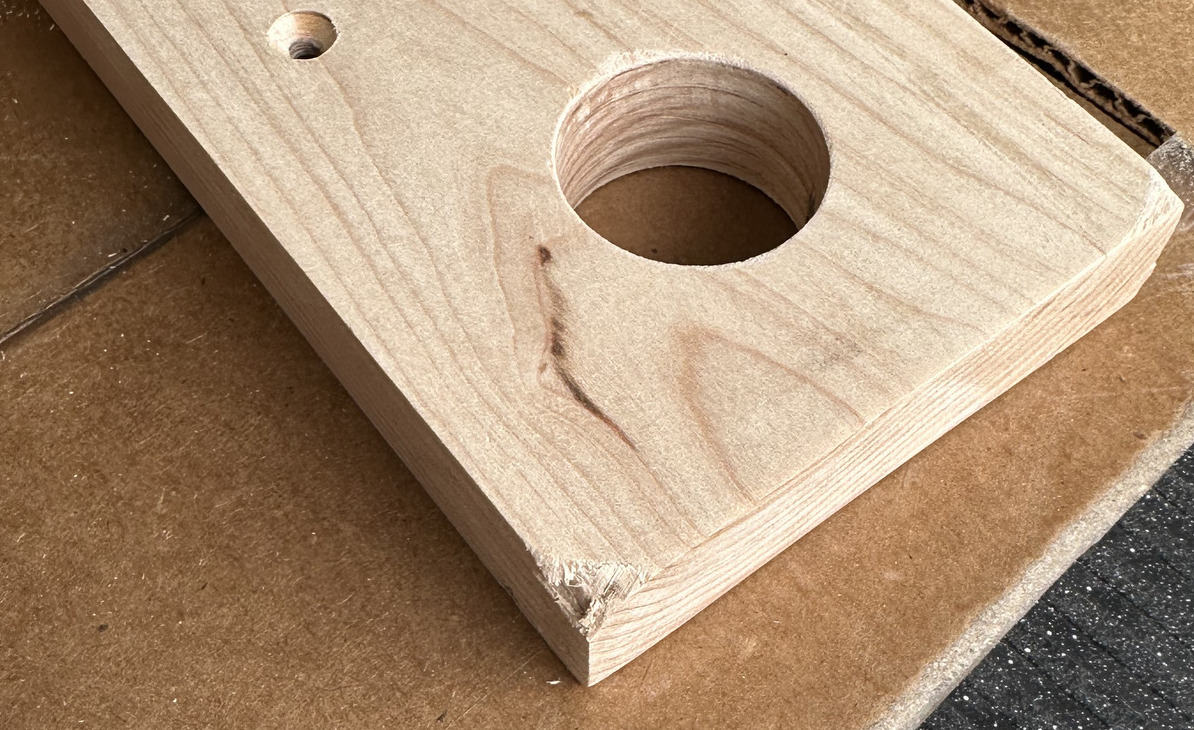
Here’s what mine looks like from the top:
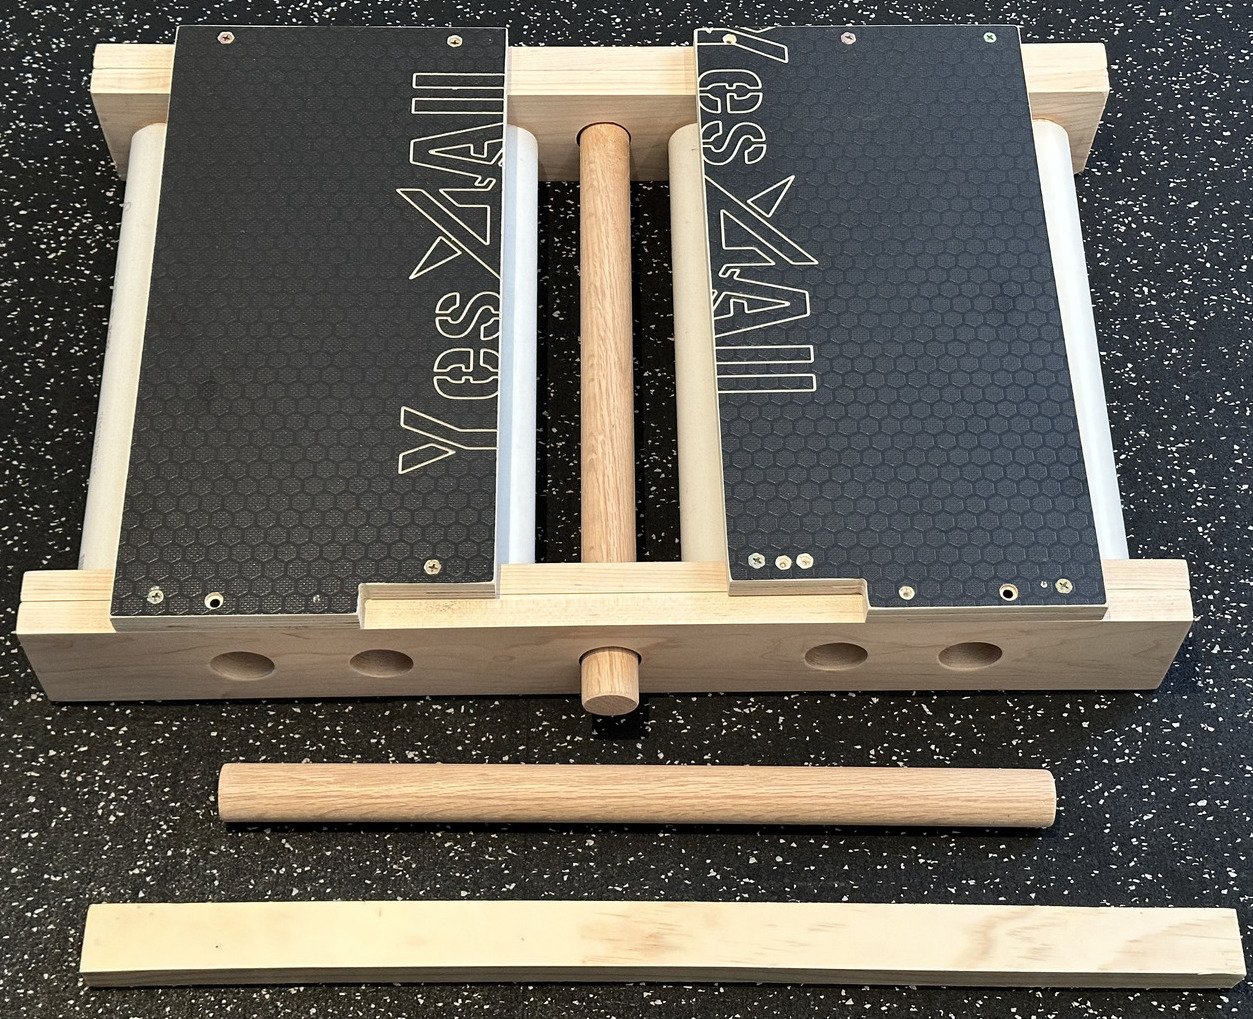
And, the bottom:

You might see some flaws, e.g. the notches on the top are a mistake. There are many others. It makes me sad to look at it, because I worked very hard to get here. The important thing I have to remember is that it works well, and I don’t have to have a trap bar and plates.
BandBox Fixation
One alternative to the BandBox is to use a board with feet so the bands can slide underneath. You can buy one for $300. Some people built the same thing using a plastic cutting board with hockey pucks for the feet. However, Goblin’s BandBox is better and allows for other activies like side pulls.
My BandBox fixation became acute. I sought out what Pascal calls “idle rollers”, which are called “gravity rollers” in the US. I should mention that Pascal is Swiss, and you might notice the quality of the rollers. I wanted to find those, and I couldn’t. I honed in on 15 inch rollers after a bit, and ordered those. Pascal said it is hard to find those, but that wasn’t the hard part for me.
The most difficult piece to get was the anti-slip phenolic resin plywood, which I could only find in 4x8 sheets and nothing local. (While finding links for this article, I ran into this on Etsy, which would have been a good option. Buffalo board is not a name I had seen before, and that’s a good term to search for in the US.) I have a plyo box which is made out of the same anti-slip plywood. I figured this was going to be my cheapest and easiest option so I ordered one to use for this part.
All of this researching took quite a bit of time. I was quite fixated on making the best possible BandBox, of course. I’m glad the research phase was over.
First Sketch
The rollers arrived. They are solid and worked well. I started my first sketch:
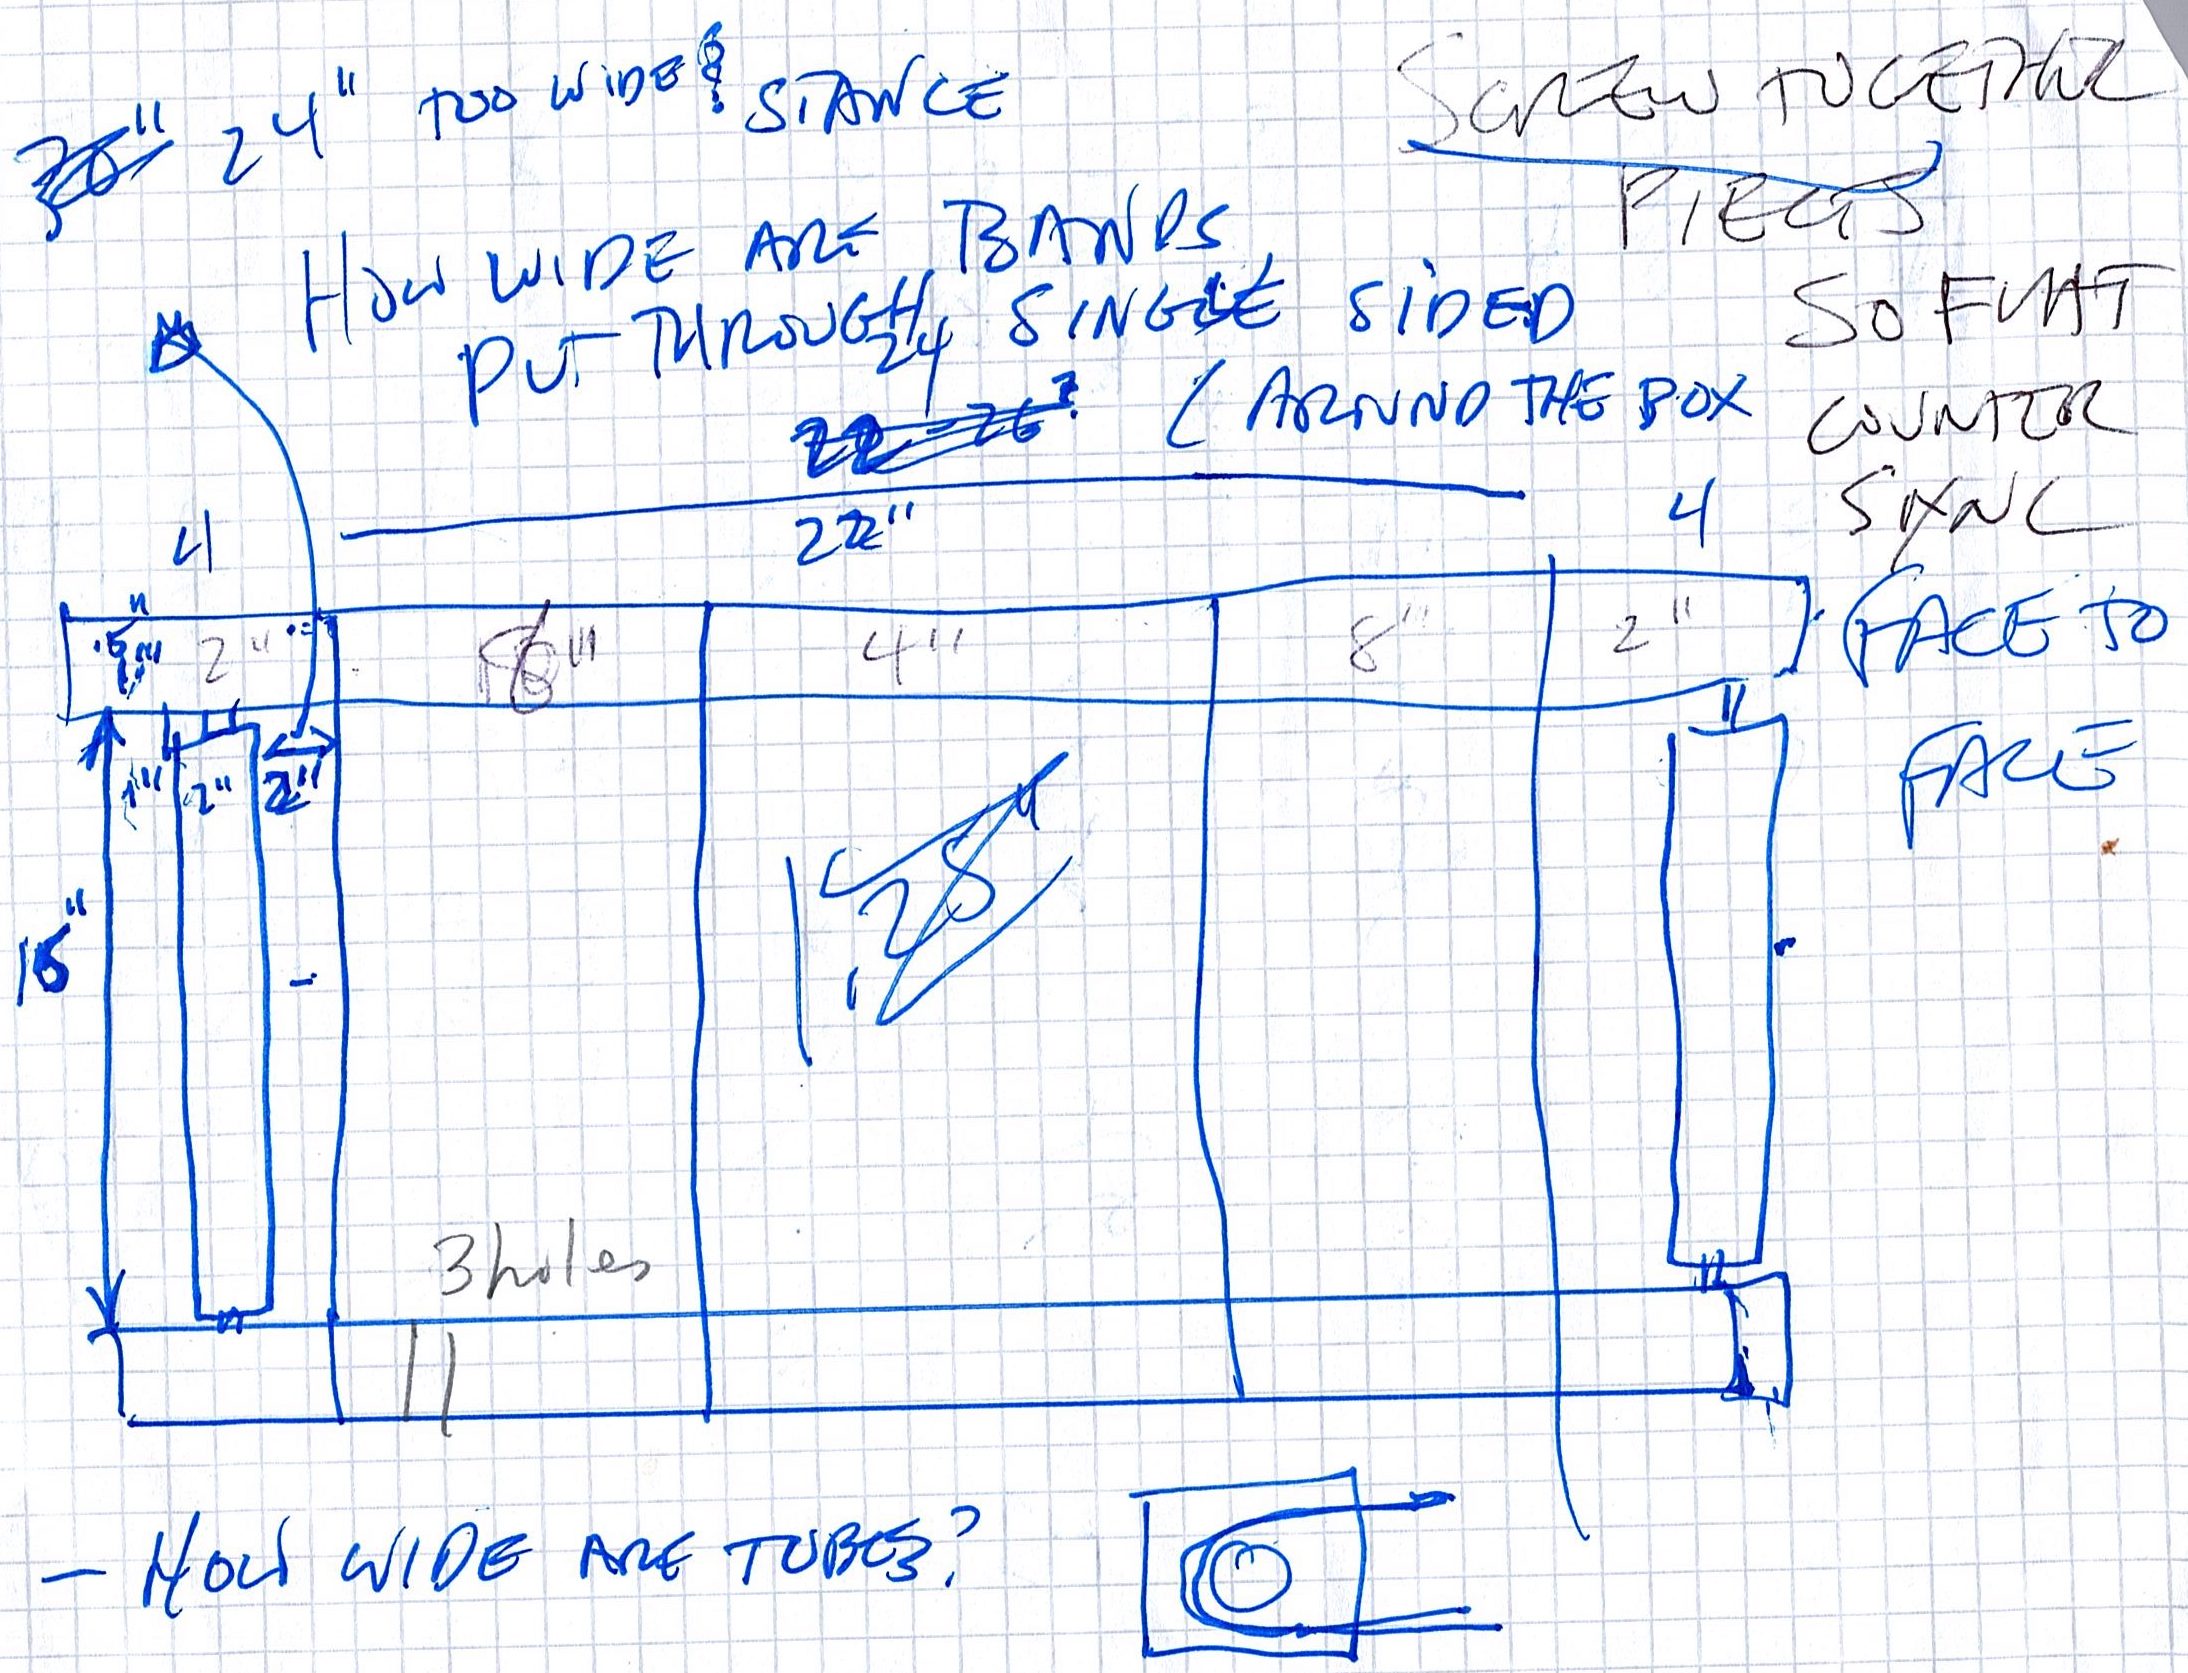
The initial depth (height in the sketch) was going to be 19 inches which was large. The rollers are very long, and this meant the whole box was going to be quite large. I wasn’t happy with the net weight of the end product either. I felt like there had to be a better solution.
That’s when I did even more research to figure out a better solution. I get kind of lost in these research activities so I spent way more time than I needed to. A Reddit post mentioned PVC and dowels instead of rollers. This is what I ended up using. I’m happy with the solution, because it’s not as deep or as heavy.
Wood Fixation
The box hardware stores have crappy 2x4s. They are quite uneven or damaged on one side. I spent too long going through stacks of 2x4s trying to find the “right one”. I ended up buying a stair tread, something I’ve used before for nice pine. They have to be straight and clean or people are going to trip going up the stairs. They are typically 1 inch thick, which was almost perfect. I had to compromise.
This meant cutting a 1 inch piece of wood straight. These are the side pieces of the BandBox and they have to be level so the box sits flat and so the cross piece (where you place your feet) is level. I figured a cutting experiment was in order. You can see the left over piece of stair tread in the first picture. My cuts (without a table saw or guide rail) were too uneven to work well. And anyway, 1 inch was a little narrow for the dowel/PVC holes.
There are many lumber places near where I live. I was out driving near one and stopped by. It was pretty quiet outside. Of course, it turned out to be just the warehouse even though Google Maps said it was a retail store. An employee said the store was actually 5 miles farther away. There were others nearby, but I decided to call them first. Nobody had clean 2x4 pine in stock. Everybody in Denver recommends Austin Hardwoods, which I decided was too far out of the way.
To cut my wood fixation short, I was in Boulder and went to Sterling Lumber (locals know this as Boulder Lumber). They had very nice maple 1x4s so I bought 9 feet, had them cut it in half to fit in my car, and went home.
Crooked Wood
The maple cost $50 ($5.50 per linear foot) so I figured it had to be straight. My motto: cut twice, measure once. I should have checked. The piece was warped, and my idea of screwing two pieces of wood together to form a 2x4 was going to take some work.
Aside. When you buy dimensional lumber in the US, e.g. 2x4s and 1x4s, you get something less than advertised. A 1x4 is really .75 by 3.5 inches. A 2x4 is really 1.5 by 3.5 inches. You can’t be annoyed by this, but you need to take this into account.
Interestingly, the single 1x4 was actually not 3.5 inches wide. Rather, it was slightly tapered. This might not matter if you are building something, but it was off enough that I was also going to have a sanding job to even out the pieces for solid support.
I figured that it wouldn’t be too bad to screw and glue the wood together so end wood fixation. Time to cut, I mean, measure.
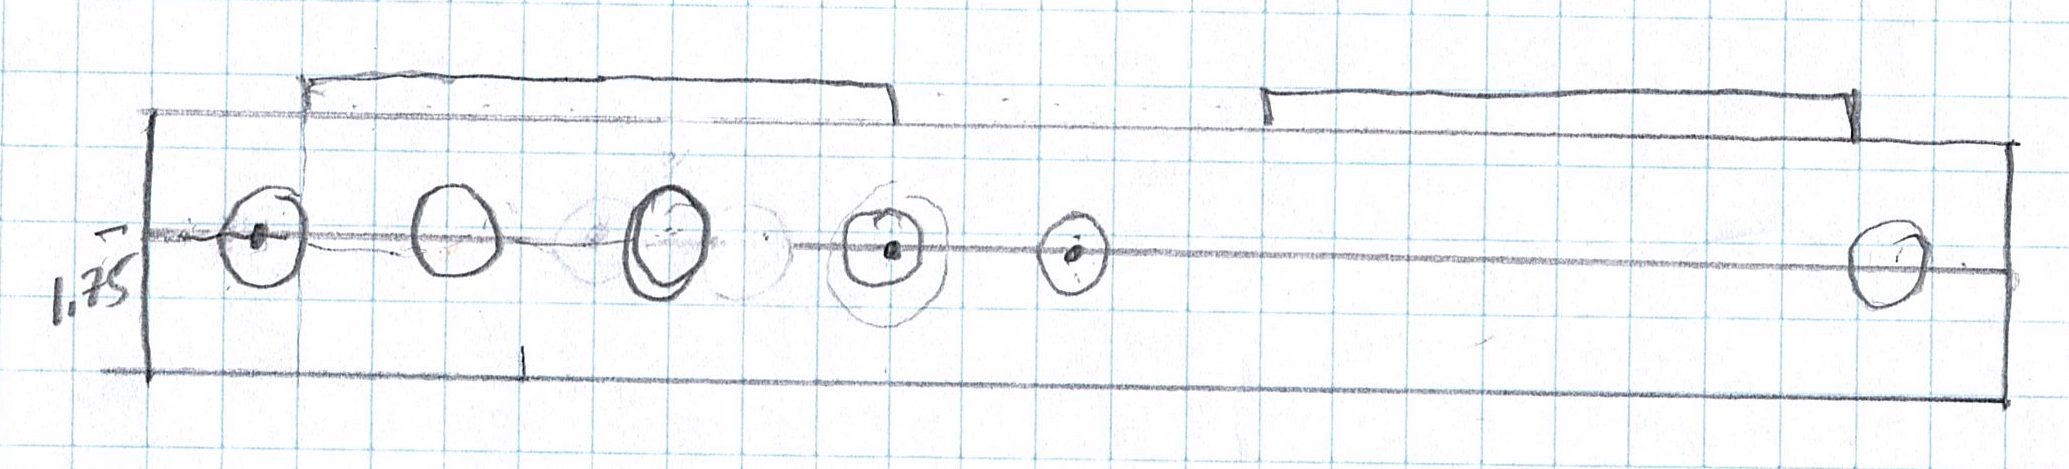
Second Sketch
I ended up with 1.25 inch oak dowels. The PVC tubing is labeled as 1 1/4, which is actually 1.375 inch so a 1.25 inch dowel fits perfectly for smooth rolling. It was time for a second sketch:
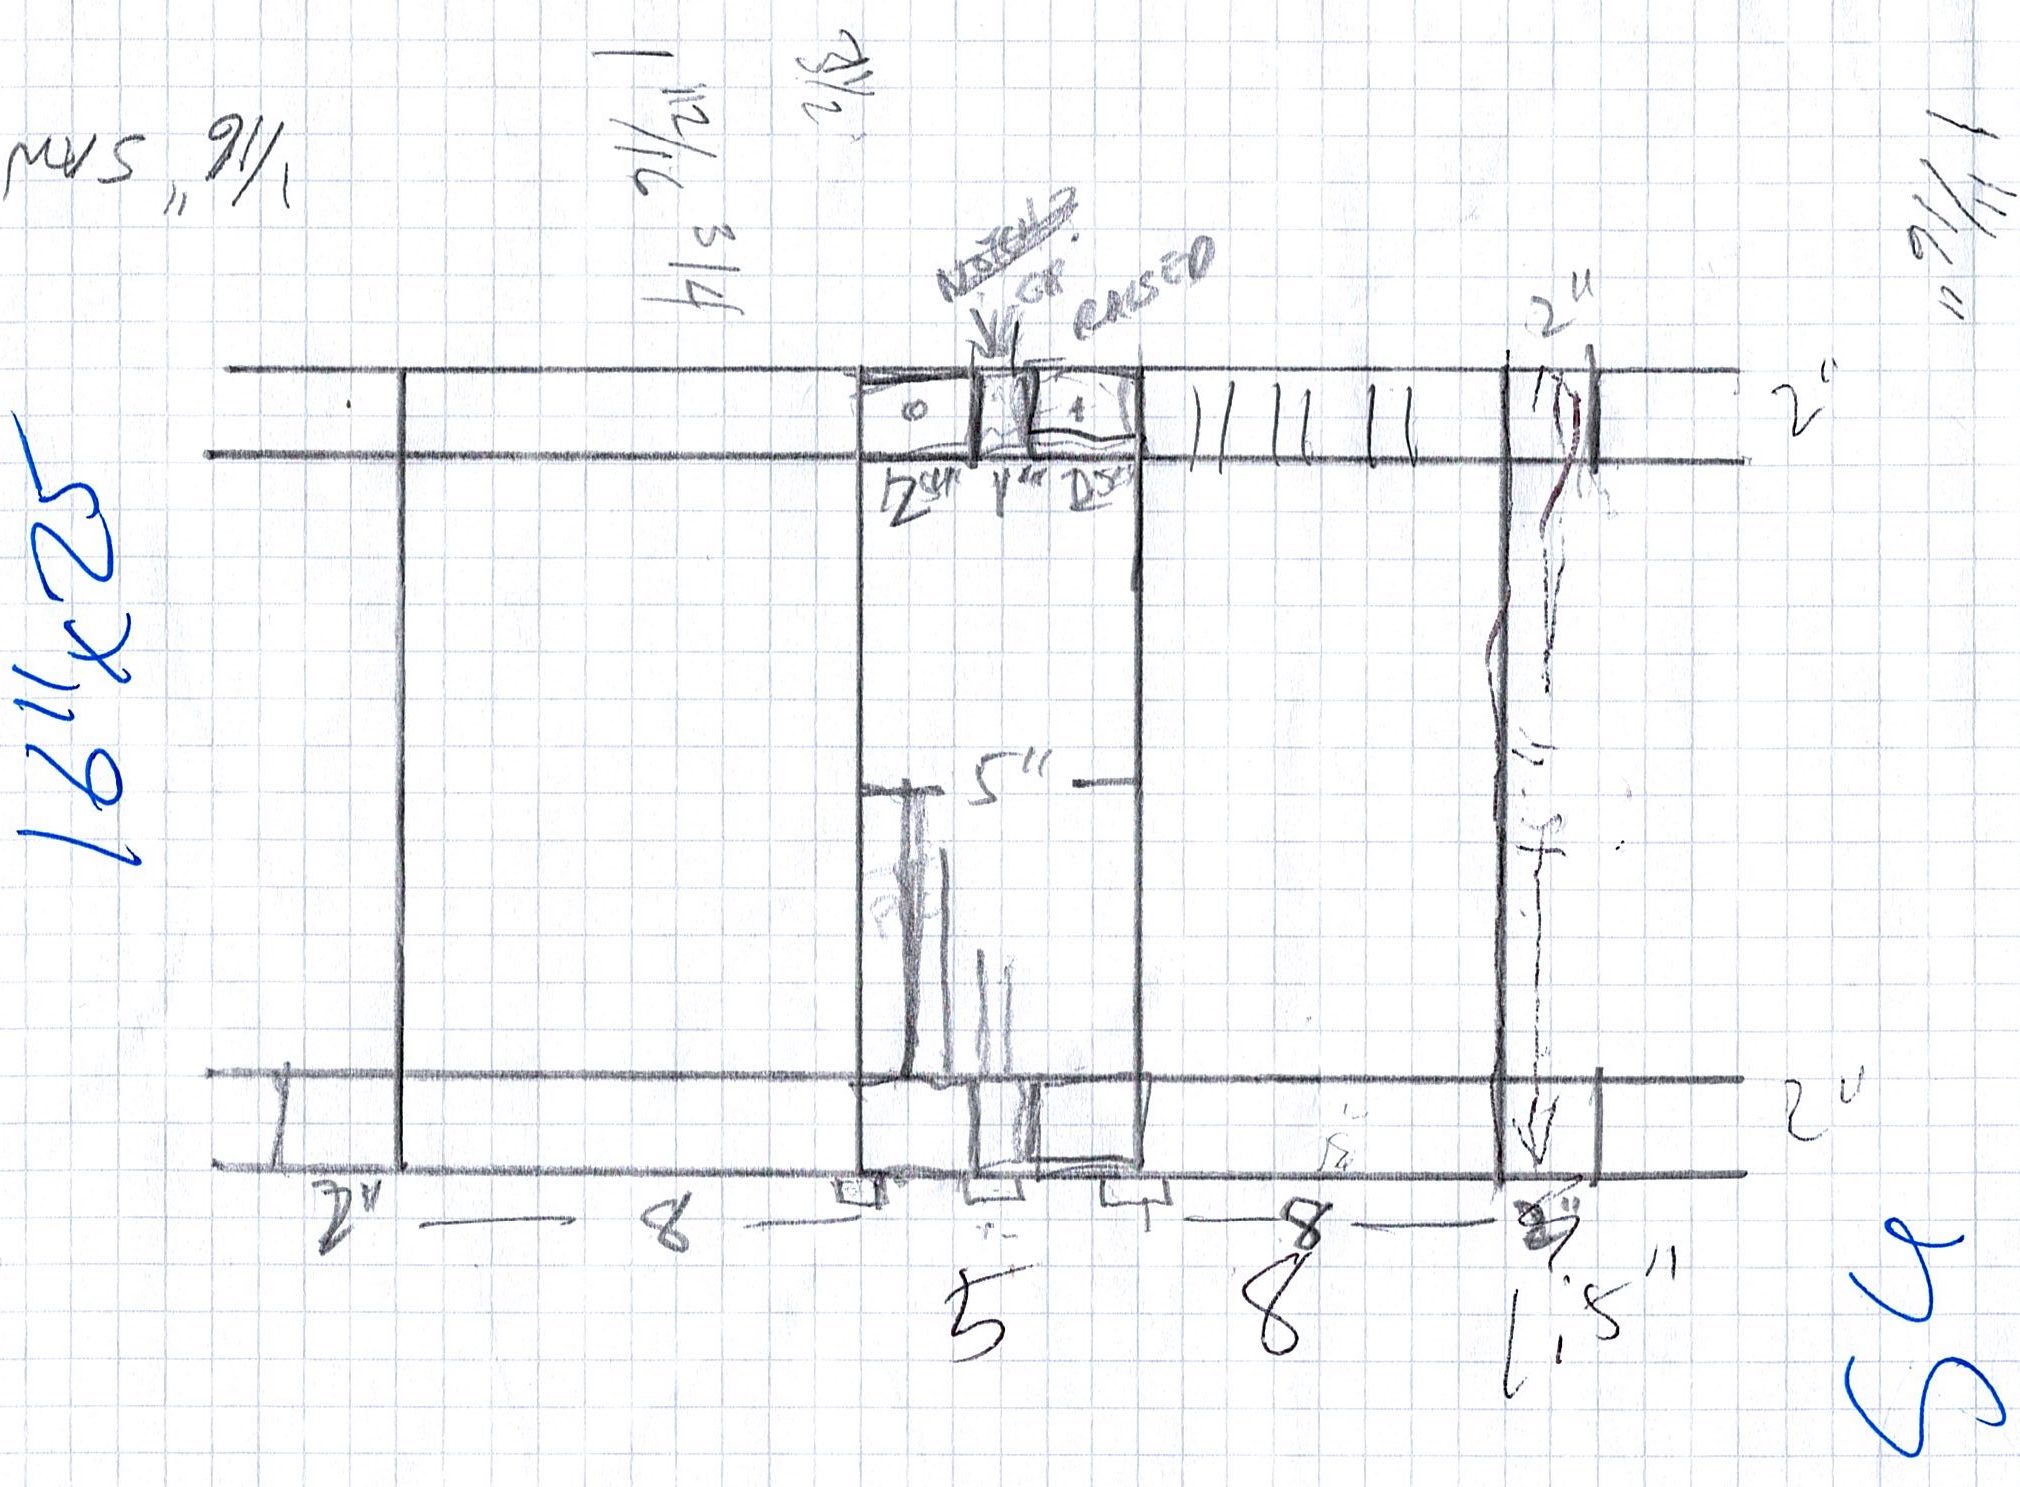
I was feeling quite good about the wood and dimensions. Things were coming together. Take note of the quick three sets of parallel lines where the three extra holes would go. I was following Pascal’s diagram (included without permission):
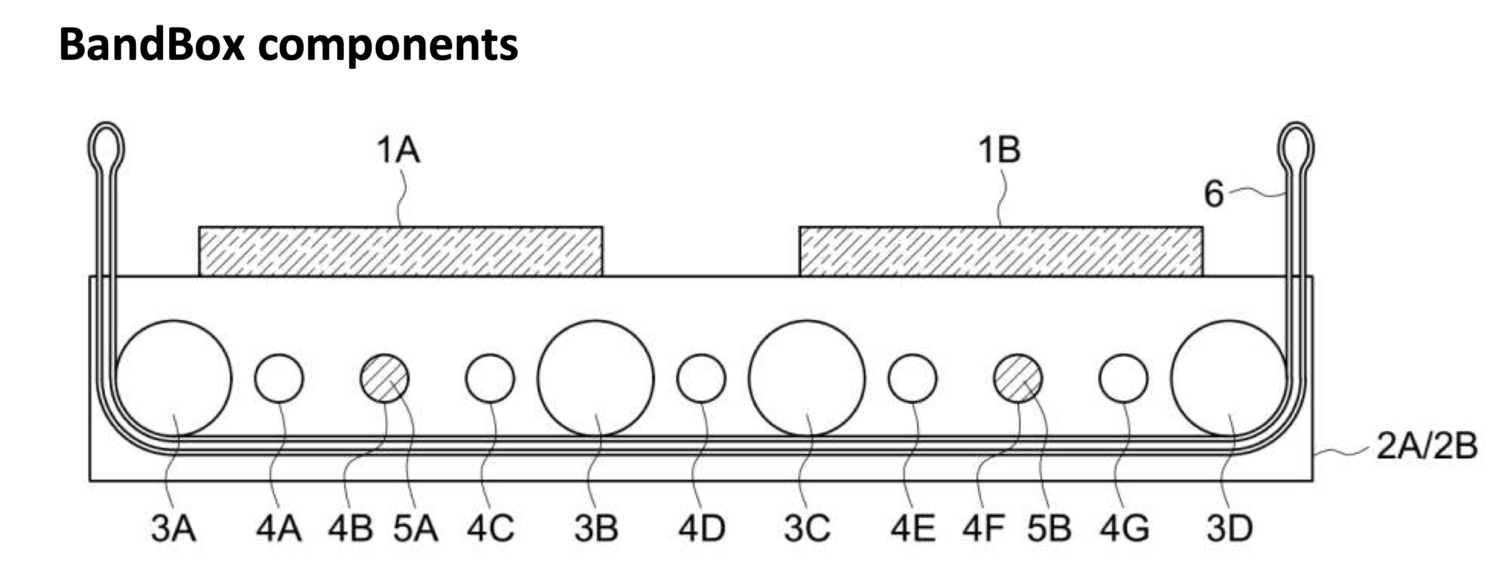
I’m referring here to holes 4A through 4F.
Cut the Cake
This project was taking quite a bit of time, and I was starting to get annoyed with my perfectionism. That’s always a bad sign for me. I needed to take some breaths. Thankfully Janis helped me see that the product wasn’t as important as the process. I actually like building things, but I still get upset at myself for taking so long doing it. This is a common loop I get into. By writing this article, I hope to help myself process this process.
The dowels were first. They had to be even, because they would form part of the support of the box. I used a backsaw and cheap mitre box that I’ve had for years. Oak is pretty tough to cut, and it took longer than expected.
For the PVC, I broke out the reciprocating saw. The PVC was harder to clamp so the backsaw wasn’t going to work. Naturally in my carefulness about the PVC I got my thumb between the back of the shoe and the chassis. Ouch!
The maple boards were next, and they went smoothly. I was careful to clamp them together so that the two pieces would be the same length. A little crooked on the end, since I was using a circular saw, free hand.
Puzzling over the Plyobox
The anti-slip plywood was next. I needed to figure out how to get the right pieces out of the plyo box, which comes in six pieces with lots of logos and holes in the wrong places. Here’s a picture of the assembled plyo box (included without permission):

What I had failed to think about was the length of each piece was not 20 inches or 18 inches. I needed two pieces that were 8 x 16 inches. That meant the 16 inch piece was right out, and the 18x16 piece was the best choice.
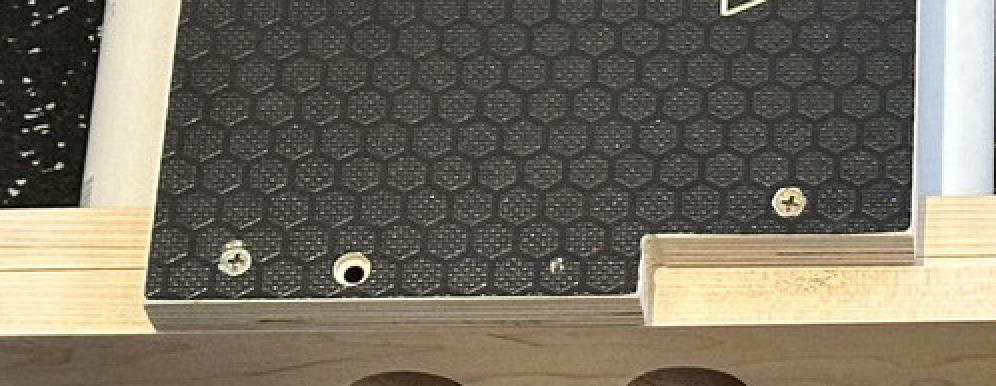
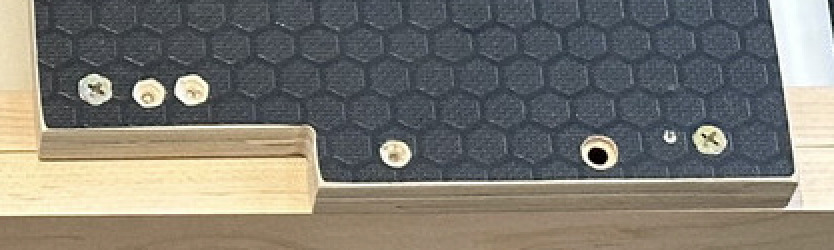
I screwed the two faces together, checking carefully that I would get minimal writing on the foot plate. After screwing together the resin coated faces to avoid messing up the resin, I ended up with this:
This made me happy despite a few imperfections in the resin. I was annoyed, but I wasn’t going to fuss over it.
Sanding and Hands
The crooked maple pieces needed to be sanded to make them even. This turned out to be quite a job. Maple is dense, and it takes a long time to sand it down. I was using a vibrating sander which makes a mess, and well, vibrates.
I had done all this in one day, because I wanted to be done with the messy cutting and sanding. It was getting on 4 or 5 hours, which, back in the day, would have been no problem for me. Given my age and lack of recent woodworking, I should have not been surprised when my hands cramped, like big time.
In the end, I had to accept the limits of my aging body, and stop for the day. This was very frustrating, because there was plenty of light and I wasn’t ready to stop.
This fluke in my process really hit me hard. I don’t like feeling my age. I am generally fine with it, and I accept many limits. My hands are the one thing that I worry about.
Dowelry
With all pieces finally sanded, the next step was assembly. While I was happy with the wood dowels, what I failed to think about was that the 1.25 inch dowels were quite wide. Remember holes 4A through 4F in Pascal’s sketch? Well, it was going to be really hard to achieve that.
In hindsight, I should have used two different sized dowels. A BandBox’s rollers need to be wide so the bands aren’t pinched when looping over the roller. However, the in-between dowels are fixed, and the bands aren’t intended to move over them. I probably could have gotten away with 1 inch dowels all around, or even 0.75 inch dowels for the removable pins which help when doing one sided exercises.
Third Sketch
The best plan was to have two holes underneat the foot plates instead of three. Here’s the quick sketch I did:
More compromises due to the randomness of the process. While it seemed like I was planning thoroughly, I simply didn’t have the experience to know to plan this part out fully. I didn’t want to sit in sketchup for hours, and as it turns out, I’m glad I didn’t. I was in for more chaos.
Hard Wood Drilling
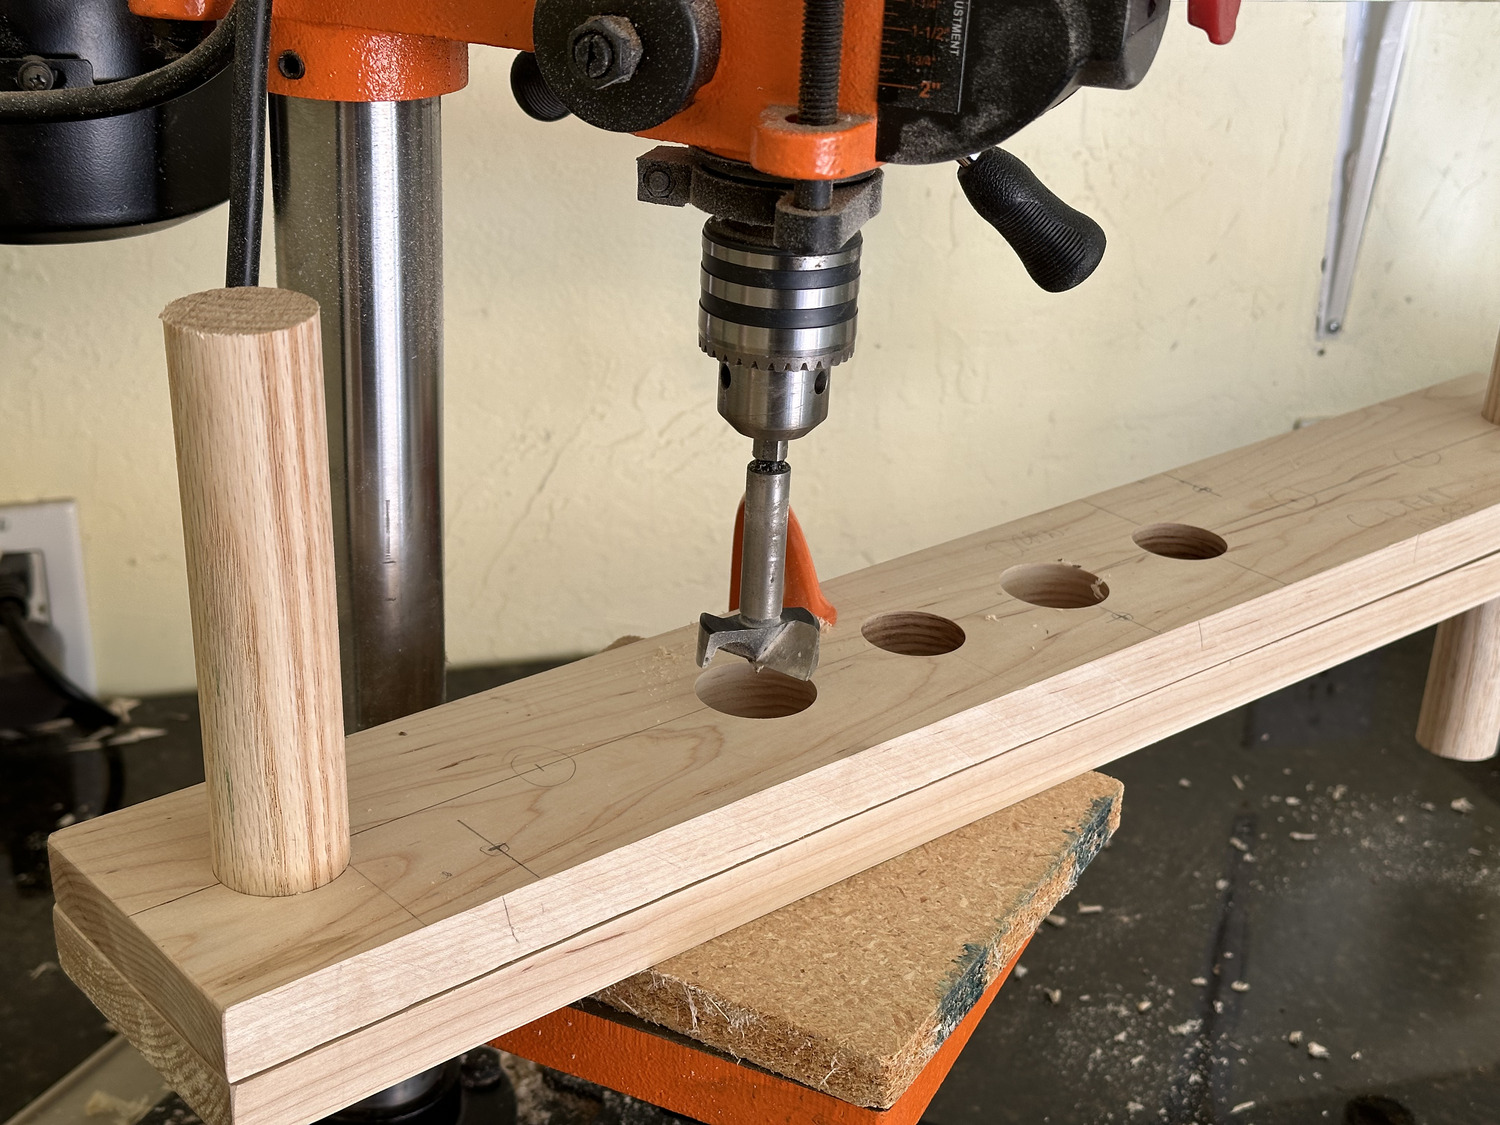
Luckily my son has a drill press so I was able to cut precise holes in the maple support pieces. I just needed to mark things out when I realized that I had a 1 inch forstner drill bit and one that was 1.375 inches. The latter was what I was going to use for the holes for the removable pins. That’s why I bought 1.25 inch dowels in the first place.
Off to the hardware store to buy a 1.25 inch forstner drill bit. That was an ouch of about $20 that I hadn’t planned for.
The drilling itself went quite well. I got the shopvac out. Drilling large holes creates a lot of wood shavings. Drilling into maple even more. The drill bit got hot. I would stop to vacuum up the shavings. It was only after the third hole that I realized I could hold the vacuum hose right next to the drill bit. I had done this in the past, but being out of practice, I forgot. That made the mess cleaner, but then I had to allow time for the bit to cool down.
It took about 5 minutes to drill one large hole. I had picked maple, because I wanted it to look nice. It would have been much better to use pine. Strong enough, and it would have looked good enough. Drilling would have been faster and better.
The small holes for the screws were the worst. I should have regeared the drill press, but I was too lazy. It went too fast and the wood smoked. Going slowly didn’t seem to help. The smaller bit got much hotter, faster than the forstner bits, which have much more mass and better contact with the drill chuck which also dissipates the heat.
I should mention that I clamped the two inner support pieces of wood face to face to make the first set of holes. Once the two end holes were cut, I could put in some leftover dowel pieces to ensure all the dowel holes would align. Here’s what the drilling looks like:
Assembly!
With all the pieces cut, sanded, drilled, and sanded (again), it was time to assemble everything. This was an evening activity, because assembly is always simple after the hard work above. Here are all the parts beautifully arranged:
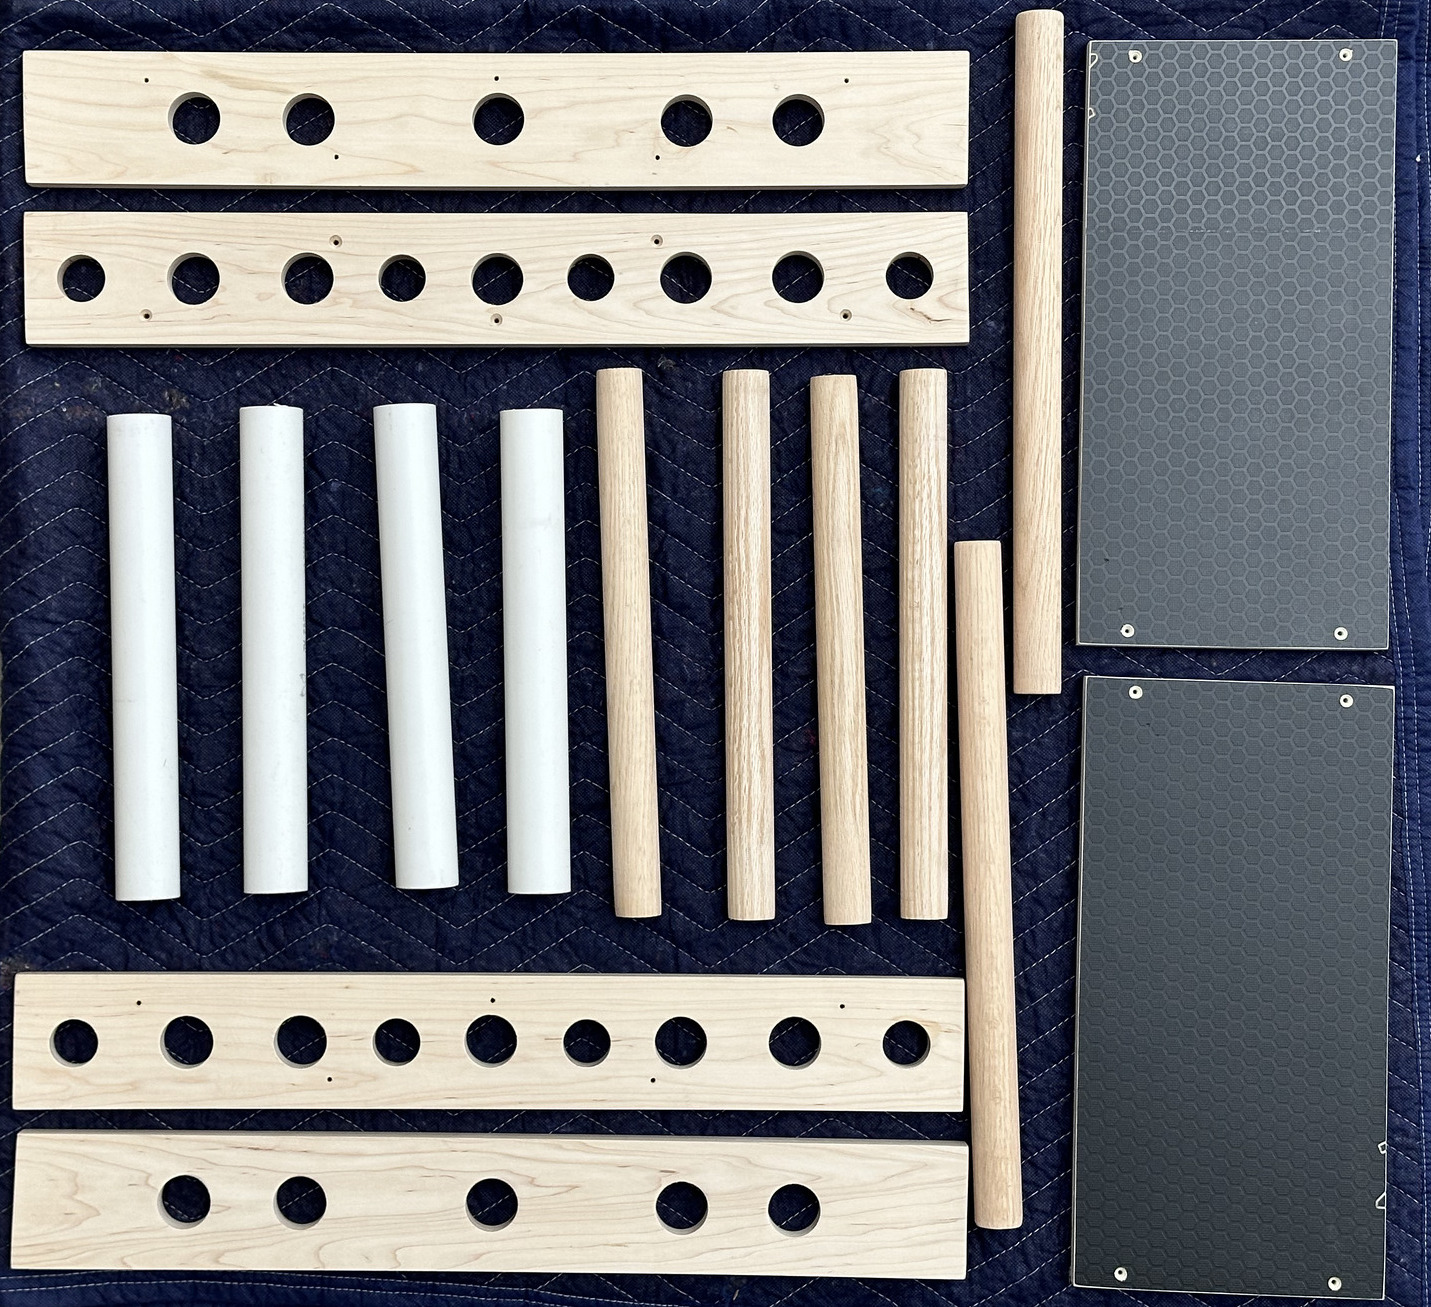
Be sure to go back and look at the finished BandBox and compare the parts to see if you can see a key difference between these parts and what finally got assembled.
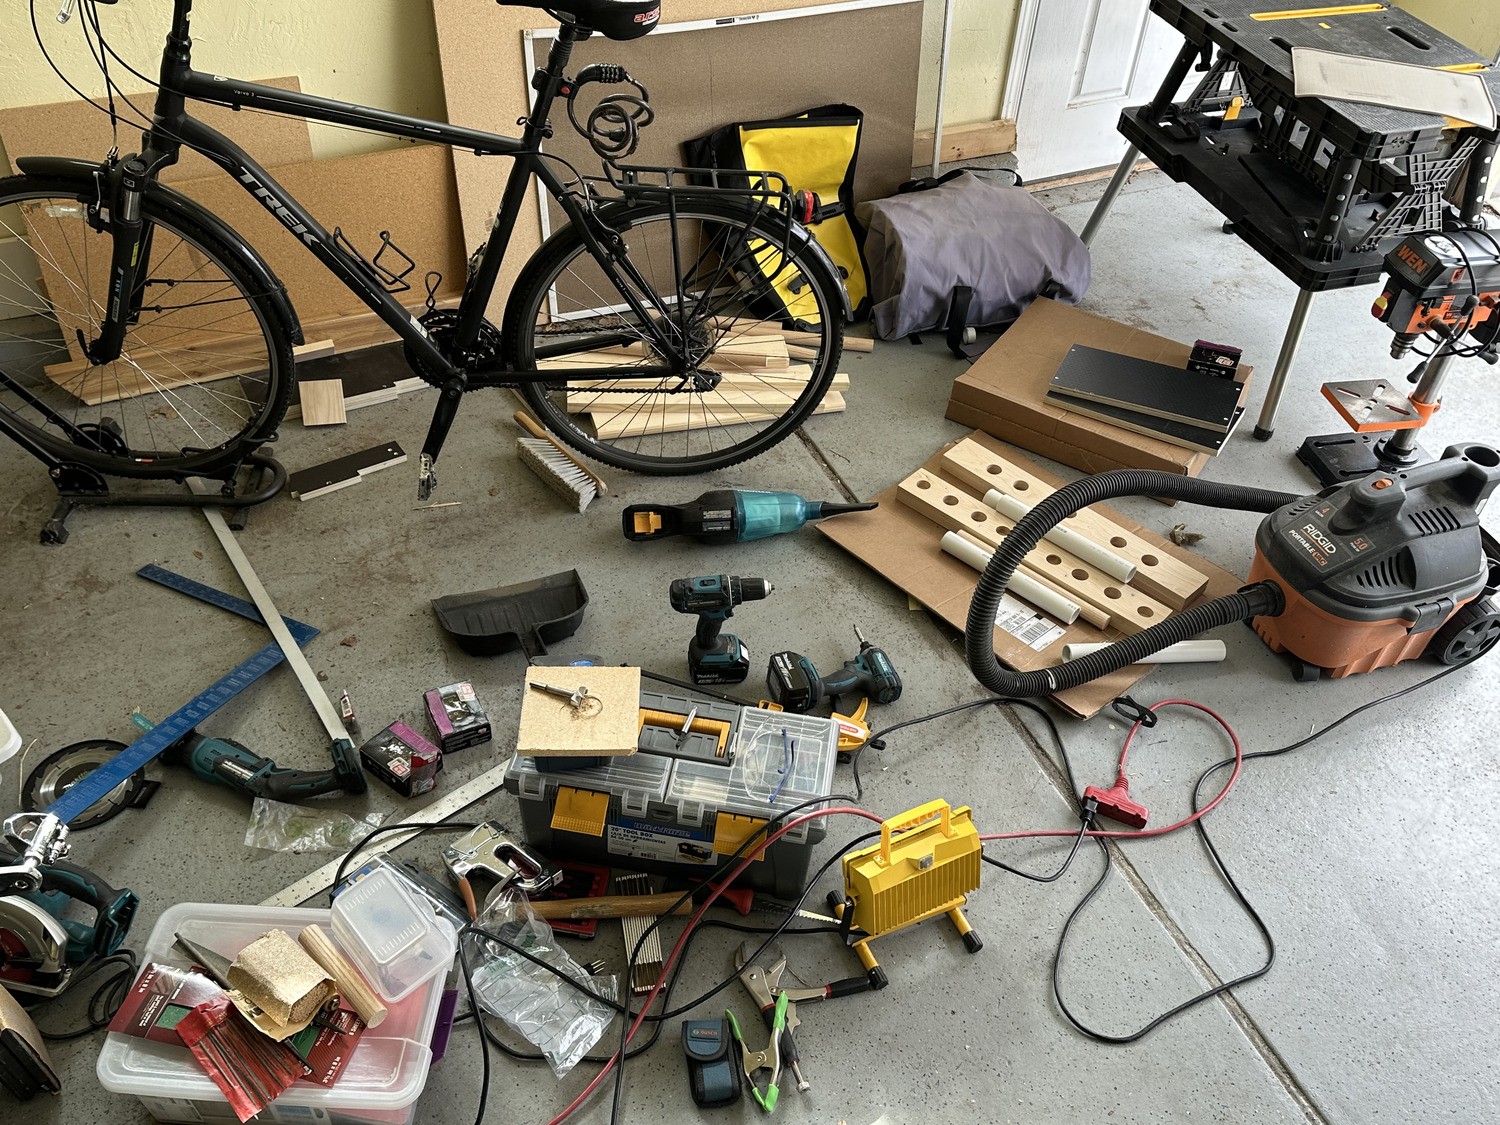
Cluttered Work Area, Cluttered Mind
Again, I was getting annoyed with how long this project was taking. Part of my frustration was that I don’t have a dedicated work bench any more, because we needed space in the garage for both cars. My work area was a mess:
I started assembling.
I screwed the side pieces together, and I quickly realized that I wasn’t going to flatten the bent side pieces with screws. A couple of screws broke so I was going to have to glue the pieces together. No tragedy, and the end product would be stronger.
Screw You Glue
Since the screws broke in the first attempts at assembly, I went to the hardware store one more time to get better screws. Unlike the selection of the wood, I rushed the process. I also didn’t think clearly. I bought some brass screws which looked better, but were actually weaker than the steel screws I was using. They were also longer, which was good, but that made them even more likely to break off.
When I was screwing the wood together after gluing and clamping, I broke off a head in the side piece. This got me pretty flustered. I should have known brass screws were weaker. I started beating myself up pretty badly.
If you have read Zen and the Art of Motorcycle Maintenance, you will know that I was in a gumption trap, and more mistakes were going to be made.
Finally, the first side piece was glued, and I was ready to call it a night.
Devastation
As I mentioned, my garage was a mess. I needed a good place to put my perfectly cut, drilled, and sanded pieces of wood that had yet to be assembled while I was putting the one side piece together. What better place than on top of the car? Not.
Yes, I forgot to move that off the car when I stopped for the night. And, yes, someone drove off with the parts on top of the car the next day.
I just happened to go into the garage midday (the glue was still curing), and I just happened to see a piece of wood on the car after the car was back. Unbelievably, one of the two side pieces were on top of the car after having been driven over five miles with two stops.
If I hadn’t seen that piece of wood at that time, I probably would have completely chucked it in. As it was, I was completely devastated by having to start over again. The one piece that was lost had 9 very difficult to drill holes in it. I couldn’t imagine matching it up to the other side piece that was being glued.
Car Chase
After much encouragement by Janis, I went outside to look for the wood piece thinking it had to have fallen off right next to the house.
I came back in the house, and I told Janis I couldn’t find it. Janis said, maybe it fell off nearby? I was distraught and angry with myself. A great time to get into a car, I always say. Maybe I should have grabbed a beer for the road.
No accidents, and yes, I found the other piece. It wasn’t too beat up either. Just some minor dings on the corners:
I still cannot fathom how it stayed on the car for over 3 miles. It fell off in a very safe place (for a piece of wood) on an overpass crossing I-70 where there was a bit of shoulder, which no cars would likely drive on.
The only word for this is a fluke, which also happens to be the name of a book I recommend. This is simply the law or large numbers at work.
The Missing Piece
After gluing the other piece together, I was ready to put it all together. I just had to drill some holes in the edges to match up the predrilled holes in the foot plates that were – yes, you guessed it – were lost a few days before.
For some reason, it didn’t occur to me that there were four pieces of wood on top of the car: the two side pieces and the two foot plates. The foot plates were gone, gone, gone. I was going out anyway, and half-heartedly looked for them. Maybe they’ll show up on my front door (fluke!) some day.
However, I had to accept them as missing. This meant I had to use the 20x18 sides of the plyo box that I was holding in reserve. These are the ones with the big Yes4All written across them.
The Last Flaw, Not!
I matched up the pieces of wood carefully. Then I did the math, and I said 20 minus 4 is 16, which is the length of the foot plate I needed. I cut 4 inches off one side. When I went to cut the other side, I realized that I had cut too much. Here’s what it ended up looking like in the finished product:
I thought about buying a new plyo box, but that would have been $90. I also thought I could replace the piece if someday I happened upon some anti-slip phenolic resin plywood. However, there would be one more flaw.
Screwing Around
A big storm was coming in, and I wanted to be done with the messy cutting parts that I wanted to do outside. Definitely should have taken a breather, but I didn’t. Instead, I broke off several screw heads before I realized I was trying to go too deep into the maple. It was not necessary. More mistakes:
Once I switched to shorter screws and drilled out the wood a couple of times (till the smoke stopped pouring out) that I was able to use shorter (1.625 inch) deck screws without breaking heads.
Good thing that the BandBox works as intended. Time to quit working wood and start working out!
New Dimensions
I hope this story was entertaining and/or informative. I rushed through it mostly to get all the text written. I hope to get some edits from you, dear reader. Unlike woodwooking, writing and software are much more editable.
For those of you who want to attempt this, here are some dimensions on the side pieces:

The outside side pieces only have holes for the removable pins:

Parts List (measurements in inches):
- (4) 1x4 board 25W (supports)
- (2) 5/8 anti-slip phenolic resin plywood 16L x 8W (foot plates)
- (4) 1 1/4 PVC 12.75L
- (4) 1 1/4 dowel 14.5L (support PVC)
- (2) 1 1/4 dowel 18L (removable pins)
- (8) 1 5/8 deck screws
- (10) 1 1/4 flathead wood screws
P.S. there were even more incorrect cuts, but I’ve already bored you enough.